Why You’ll Love This Recipe
Homemade vanilla ice cream is one of those timeless desserts that never goes out of style. With its smooth, creamy texture and pure vanilla flavor, it’s the perfect treat on its own or as a base for sundaes, pies, and cakes. What makes homemade ice cream so special is the ability to control the ingredients—you get a richer, more authentic flavor compared to store-bought versions. I once made this recipe with vanilla bean paste instead of extract, and the tiny specks of vanilla throughout the ice cream not only looked beautiful but also intensified the flavor. Whether you enjoy it in a cone, with toppings, or simply in a bowl, this homemade vanilla ice cream is pure comfort and nostalgia in every bite.
Print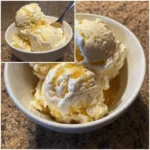
Homemade Vanilla Ice Cream – A Classic Made from Scratch
- Total Time: 10 mins + chilling
- Yield: 6 servings
- Diet: Vegetarian
Description
A rich and creamy homemade vanilla ice cream made with simple ingredients, perfect for a classic frozen treat.
Ingredients
- 2 cups heavy cream
- 1 cup whole milk
- 3/4 cup granulated sugar
- 1 tablespoon pure vanilla extract
- Pinch of salt
Instructions
- In a mixing bowl, whisk together heavy cream, whole milk, sugar, vanilla extract, and salt until sugar is dissolved.
- Pour mixture into an ice cream maker and churn according to the manufacturer’s instructions, usually 20–25 minutes, until thick and creamy.
- Transfer ice cream to a freezer-safe container, cover, and freeze for at least 2–4 hours to firm up.
- Scoop and serve with your favorite toppings.
Notes
- For a richer flavor, use vanilla bean paste instead of vanilla extract.
- You can add mix-ins like chocolate chips, crushed cookies, or fruit during the last 5 minutes of churning.
- No ice cream maker? Pour mixture into a dish, freeze, and stir every 30 minutes until creamy.
- Prep Time: 10 mins
- Cook Time: 0 mins
- Category: Dessert
- Method: Churned
- Cuisine: American
Ingredients
(Tip: You can find the complete list of ingredients and their measurements in the recipe card below.)
Heavy cream – Provides richness and ensures a velvety texture.
Whole milk – Balances out the cream for the perfect consistency.
Egg yolks – Create a custard base that makes the ice cream smooth and luscious.
Sugar – Sweetens the ice cream and helps with texture.
Vanilla extract or vanilla bean paste – The star of the recipe, giving the ice cream its classic flavor.
Salt – Just a pinch enhances the sweetness and deepens the vanilla flavor.
Directions
In a medium saucepan, whisk together the egg yolks, sugar, and salt until smooth. Gradually whisk in the milk and place the saucepan over medium heat. Cook gently, stirring constantly, until the mixture thickens enough to coat the back of a spoon (about 170–175°F). Do not let it boil.
Remove from the heat and stir in the heavy cream and vanilla extract (or paste). Pour the custard through a fine mesh strainer into a clean bowl to remove any lumps. Cover and refrigerate for at least 4 hours, or until thoroughly chilled.
Once chilled, churn the mixture in an ice cream maker according to the manufacturer’s instructions until it reaches soft-serve consistency. Transfer to a lidded container and freeze for 4 hours or until firm. Scoop and serve as desired.
Servings and timing
This recipe makes about 6 servings. Prep time is 15 minutes, cooking time is 10 minutes, and chilling/freezing takes about 8 hours in total.
Storage/reheating
Store homemade vanilla ice cream in an airtight, freezer-safe container for up to 2 weeks. To keep it soft and scoopable, cover the surface with parchment paper before sealing the lid. Let it sit at room temperature for 5 minutes before serving.

Variations and Customizations
Vanilla bean ice cream – Use whole vanilla beans for a more intense flavor.
French-style – Increase the number of egg yolks for a richer, custard-like texture.
Philadelphia-style – Skip the eggs for a lighter, quicker ice cream.
Boozy twist – Add a splash of bourbon, rum, or Kahlúa for an adult version.
Chocolate swirl – Fold in ribbons of melted chocolate before freezing.
Cookie mix-in – Add crushed cookies, brownies, or graham crackers during the last few minutes of churning.
Fruit topping – Serve with macerated strawberries, blueberries, or peaches.
Caramel ripple – Swirl in caramel sauce before freezing for extra indulgence.
FAQs
Do I need an ice cream maker?
It’s recommended, but you can make a no-churn version by whipping cream and folding it into the custard base before freezing.
Can I use low-fat milk?
Whole milk is best, but 2% can be used for a lighter texture.
How do I prevent ice crystals?
Ensure the base is fully chilled before churning and store in an airtight container.
Can I use vanilla bean paste instead of extract?
Yes, and it gives beautiful flecks of vanilla throughout the ice cream.
How long does it take to churn?
Usually 20–25 minutes, depending on your ice cream maker.
Can I double this recipe?
Yes, but churn in batches so the machine isn’t overloaded.
Is this gluten-free?
Yes, this recipe is naturally gluten-free.
Can I make it dairy-free?
Yes, substitute coconut cream and almond milk for heavy cream and whole milk.
How long should I chill the custard base?
At least 4 hours, though overnight chilling yields the best texture.
Can I skip the eggs?
Yes, but the ice cream will be less rich—try a Philadelphia-style version instead.
Conclusion
Homemade vanilla ice cream is a classic dessert that never fails to impress. With just a handful of ingredients and a little patience, you can create a smooth, creamy treat that’s far better than anything you’ll find at the store. Versatile and endlessly customizable, it’s perfect for any season and any occasion. Once you make it from scratch, you’ll understand why homemade ice cream is such a cherished tradition.
Hungry for more? Visit our website for full recipes and follow us on Pinterest for daily foodie inspo you’ll love to pin!