
This No-Oven Stovetop Bread is a kitchen lifesaver for anyone who loves homemade bread but doesn’t have an oven—or just doesn’t want to heat up the kitchen. With a tender crumb and perfectly golden crust, this bread is as good as any oven-baked loaf. All you need is a pan, a few pantry staples, and a bit of patience.
When I first tried making bread on the stovetop, I was skeptical, but the result blew me away—soft, flavorful, and beautifully risen. I brushed mine with melted butter and garlic once it was done, and it tasted like something straight from a bakery. This recipe is proof that homemade bread doesn’t need fancy equipment—just a good pan and a little love.
Why You’ll Love This Recipe
You’ll love how simple and foolproof this stovetop bread is. No oven, no fancy tools—just a stovetop and a covered pan. The bread comes out soft inside and golden on the outside, perfect for slicing, toasting, or tearing apart while still warm. It’s a budget-friendly, time-saving recipe that proves homemade bread can be deliciously easy.
Print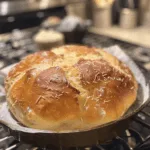
No-Oven Stovetop Bread – Soft, Golden, and Unbelievably Easy (Don’t Lose This Recipe!)
- Total Time: 1 hr 30 mins (including rising)
- Yield: 1 medium loaf (6–8 slices)
- Diet: Vegetarian
Description
Soft, fluffy, and golden stovetop bread made without an oven! This easy no-bake bread is cooked in a pan and turns out perfectly tender inside with a crisp outer crust — ideal for sandwiches, breakfast, or as a side for soups and stews.
Ingredients
- 2 1/4 cups all-purpose flour
- 1 tbsp sugar
- 1 tsp salt
- 1 tbsp instant yeast
- 3/4 cup warm milk (about 110°F / 43°C)
- 1/4 cup warm water
- 2 tbsp melted butter or oil (plus more for greasing pan)
- Optional: 1 tbsp milk or melted butter for brushing top
Instructions
- In a large bowl, combine warm milk, warm water, sugar, and yeast. Let sit for 5–7 minutes until frothy.
- Add the flour, salt, and melted butter to the yeast mixture. Mix until a soft dough forms.
- Knead the dough for about 8–10 minutes until smooth and elastic. If the dough is sticky, add a little more flour as needed.
- Cover and let the dough rise in a warm place for 45–60 minutes or until doubled in size.
- Punch down the dough and shape it into a round or oval loaf that fits your pan.
- Grease a heavy skillet or non-stick pan with butter or oil and preheat it over very low heat for 2–3 minutes.
- Place the dough in the pan and cover with a tight-fitting lid. Cook on low heat for 15–20 minutes, checking occasionally to ensure it doesn’t burn.
- Flip the bread carefully using a spatula and cook the other side for another 10–15 minutes until golden brown and cooked through.
- Brush the top with melted butter or milk for a soft, shiny crust. Let cool slightly before slicing.
Notes
- Use a heavy-bottomed or cast-iron skillet for even cooking.
- Keep the heat low to prevent burning and ensure the inside cooks fully.
- Add herbs, garlic, or cheese to the dough for extra flavor.
- This bread stays soft for 2–3 days when stored in an airtight container.
- Prep Time: 15 mins
- Cook Time: 30–35 mins
- Category: Bread
- Method: Stovetop
- Cuisine: Universal
Ingredients
(Tip: You can find the complete list of ingredients and their measurements in the recipe card below.)
All-purpose flour – The base of the bread, providing a soft and tender crumb. You can also mix in some whole wheat flour for a heartier texture.
Active dry yeast – Helps the bread rise beautifully, giving it that fluffy bakery-style texture.
Warm water – Activates the yeast and brings the dough together. Make sure it’s warm, not hot, to avoid killing the yeast.
Sugar – A small amount to feed the yeast and help it bloom quickly.
Salt – Balances the flavor and enhances the natural taste of the bread.
Olive oil or melted butter – Adds richness and moisture to the dough, keeping it soft for days.
Milk (optional) – A splash of milk makes the bread richer and softer, though water alone works just fine.
Butter (for brushing) – Melting butter over the warm bread adds a glossy finish and extra flavor.
Directions
In a large bowl, combine warm water, sugar, and yeast. Let it sit for about 5–10 minutes until the mixture becomes frothy.
Add salt, olive oil (or melted butter), and flour gradually, mixing with a spoon until the dough comes together. Transfer to a lightly floured surface and knead for 6–8 minutes until smooth and elastic. If the dough feels sticky, sprinkle in a bit more flour.
Place the dough in a greased bowl, cover with a clean towel, and let it rise in a warm spot for 1 hour or until doubled in size.
Punch down the dough to release air and shape it into a round loaf or divide it into smaller portions for mini breads.
Lightly grease a heavy-bottomed pan or non-stick skillet with a little oil or butter. Place the shaped dough in the pan and cover it with a lid. Let it rest for another 15 minutes before cooking.
Turn the stove to the lowest heat setting and cook the bread, covered, for 15–18 minutes on the first side. Check the bottom—when it’s golden brown, carefully flip it. Cook the other side for another 10–12 minutes until fully cooked and golden all over.
Remove from the pan, brush with melted butter, and let it cool slightly before slicing.
I like to sprinkle a pinch of sea salt or garlic powder over the top right after brushing with butter for a flavorful finish.
Equipment needed :
Must-Have Tools to Get Rolling
Here’s what you’ll want to have on hand:
Silicone Spatula – Durable, heat-resistant silicone spatula perfect for mixing, scraping, and spreading. Gentle on non-stick cookware and easy to clean.
Large pot – You’ll need this to boil the whole cabbage head and soften the leaves.
large bowl –Spacious, durable large bowl ideal for mixing, serving, or food preparation. Made from sturdy material and easy to clean.
Sharp knife – For coring the cabbage and slicing out the thick stem in each leaf. A paring knife works best.
Mixing bowl – A big bowl makes it easier to combine your meat and rice filling evenly.
Cutting board – For prepping cabbage leaves and rolling them like a pro.
9×13-inch baking dish – Ideal size to fit your rolled cabbage leaves snugly and prevent them from unraveling.
knife – A sharp, durable kitchen knife perfect for slicing, chopping, and dicing with ease
Servings and timing
This recipe makes 1 medium loaf or 6 small rounds.
Preparation time: 15 minutes
Rising time: 1 hour 15 minutes
Cooking time: 30 minutes
Total time: 2 hours
Storage/reheating
Store leftover bread in an airtight container or wrap it in foil at room temperature for up to 2 days. For longer storage, refrigerate for up to 5 days. To reheat, warm it on a dry pan for 1–2 minutes per side or in a microwave for 10 seconds. You can also freeze it for up to 1 month—just thaw before reheating.

Variations and Customizations
Garlic Herb Bread – Add minced garlic and chopped parsley or rosemary to the dough for an aromatic twist.
Cheesy Bread – Sprinkle shredded mozzarella or cheddar inside the dough before cooking for a gooey surprise.
Whole Wheat Version – Replace half the all-purpose flour with whole wheat flour for extra fiber and flavor.
Sweet Breakfast Bread – Mix in 2 tablespoons of sugar and a handful of raisins or chocolate chips for a breakfast-style loaf.
Stuffed Flatbread – Fill the dough with sautéed onions, cheese, or spinach for a savory treat.
Olive and Herb Loaf – Add sliced olives and dried oregano for a Mediterranean flair.
Cinnamon Sugar Twist – Brush the cooked bread with butter and sprinkle with cinnamon sugar for a dessert-like variation.
Milk Bread Softness – Replace half the water with warm milk for an ultra-soft, richer texture.
Yogurt Bread – Mix a few tablespoons of yogurt into the dough for tangy softness and extra tenderness.
Butter Crust Finish – Brush both sides of the bread with melted butter while still warm for a glossy, flavorful crust.
FAQs
Can I use instant yeast instead of active dry yeast?
Yes, you can substitute 1:1 and skip the proofing step—just mix it directly with the flour.
How do I know if the bread is cooked through?
Tap the top—it should sound hollow. You can also insert a toothpick; it should come out clean.
Can I make this bread without oil or butter?
Yes, but it will be slightly less rich. Replace with water if needed.
Can I add seeds or grains?
Absolutely. Mix in sesame seeds, sunflower seeds, or oats before cooking.
What type of pan works best?
A heavy non-stick skillet or cast-iron pan with a lid works perfectly.
Can I make this gluten-free?
Yes, use a gluten-free all-purpose blend, but you may need to adjust the liquid slightly.
How do I prevent the bread from burning?
Keep the heat low and check occasionally. Covering helps trap steam for even cooking.
Can I make rolls instead of a loaf?
Yes—divide the dough into small balls and cook them the same way for mini stovetop rolls.
What can I serve this bread with?
It pairs wonderfully with soups, stews, or even as a sandwich base.
Can I use self-rising flour?
Yes, just skip the yeast and salt; the texture will be more like soft flatbread.
Conclusion
This No-Oven Stovetop Bread proves that you don’t need an oven to enjoy freshly baked bread. Soft, golden, and full of homemade goodness, it’s the perfect base for any meal—or simply enjoyed warm with butter. Whether you’re living in a small space, camping, or just want an easy baking alternative, this recipe is one you’ll treasure and make again and again.
Hungry for more? Visit our website for full recipes and follow us on Pinterest for daily foodie inspo you’ll love to pin!