Why You’ll Love This Recipe
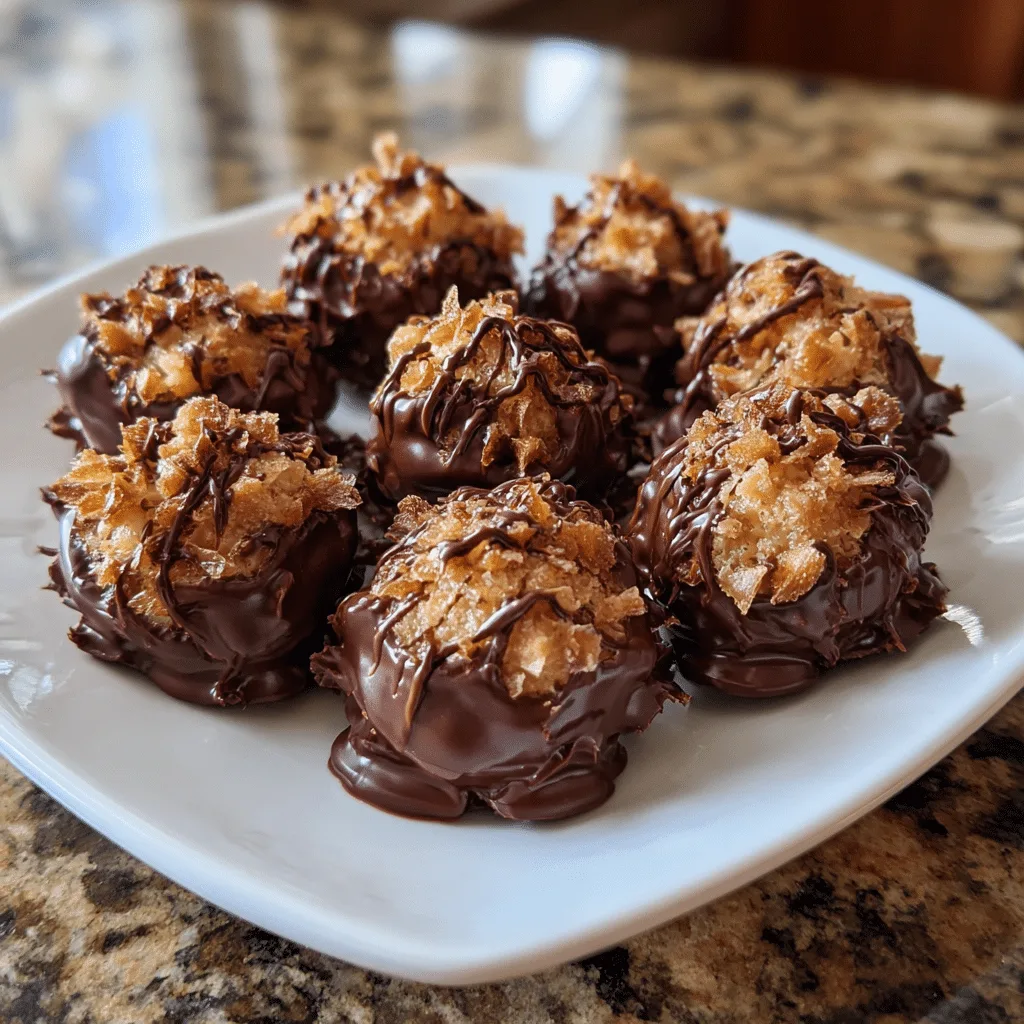
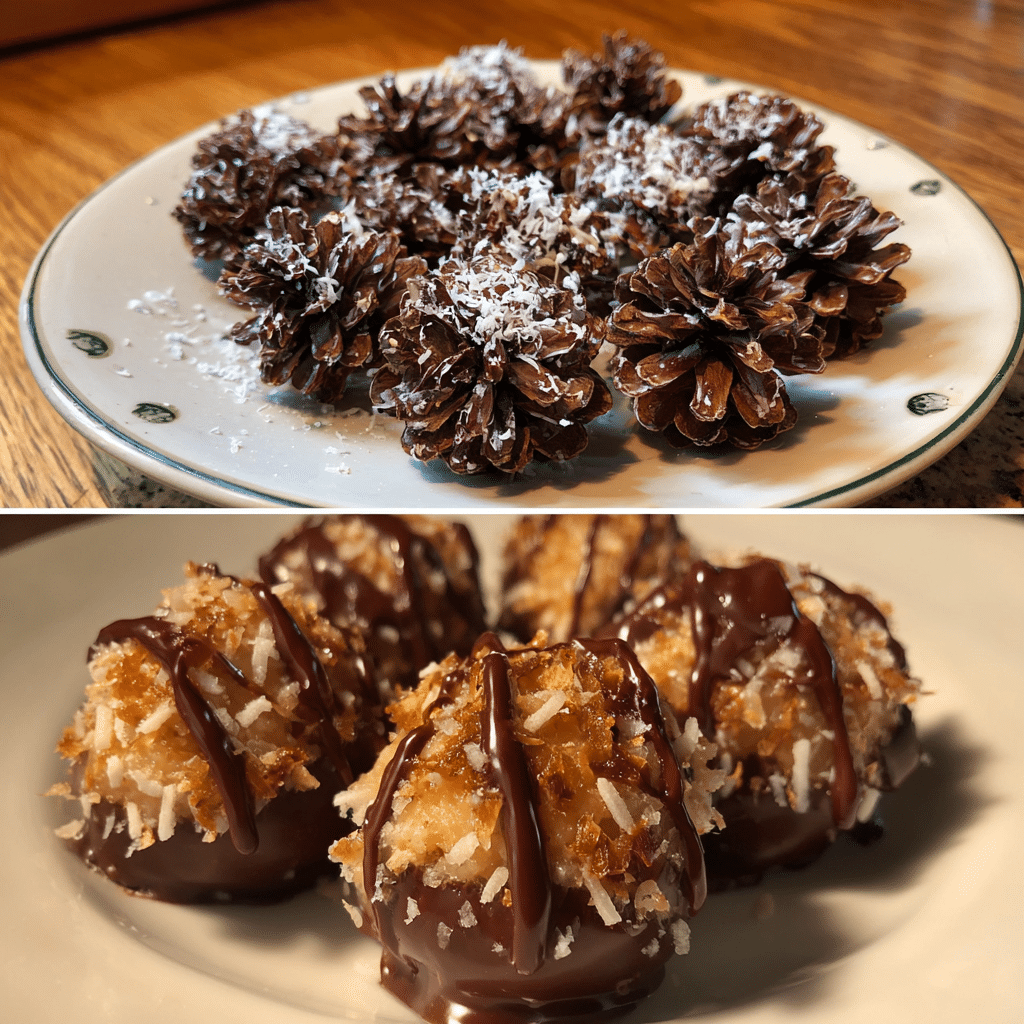
Pinecone Truffles are one of those rare desserts that look breathtaking yet require remarkably little effort. These charming, rustic treats combine a rich chocolate truffle base with crisp cereal “scales,” creating a realistic pinecone shape perfect for winter tablescapes. They make a beautiful addition to dessert platters, edible gift boxes, or festive centerpieces. What I love most is how customizable the truffle mixture can be; once, I replaced the usual cream with warmed almond milk, and the truffles still held their shape and tasted delightfully smooth. Their no-bake nature makes them ideal for busy holiday seasons, and they are particularly fun to assemble with children thanks to their tactile, crafty design. If you want a dessert that’s elegant yet approachable, and guaranteed to impress at first glance, these Pinecone Truffles are an excellent choice.
Print
Pinecone Truffles – A Stunning, No-Bake Holiday Showstopper
- Total Time: 50 mins (including chilling)
- Yield: 10–12 truffles
- Diet: Vegetarian
Description
Cute and delicious no-bake chocolate truffles shaped like pinecones using a creamy chocolate base and mini cereal or sliced almonds for the scales—perfect for winter or holiday treats.
Ingredients
- 8 oz cream cheese, softened
- 1/2 cup unsalted butter, softened
- 1/2 cup cocoa powder
- 2 cups powdered sugar
- 1 tsp vanilla extract
- 1/4 tsp salt
- 2 cups chocolate Chex cereal or sliced almonds (for pinecone scales)
- Cocoa powder or powdered sugar for dusting (optional)
Instructions
- In a large mixing bowl, beat cream cheese and softened butter until smooth.
- Add cocoa powder, powdered sugar, vanilla, and salt. Mix until a thick, smooth truffle dough forms.
- Refrigerate the mixture for 20–30 minutes to firm slightly.
- Divide the mixture into small portions and shape each one into an oval resembling a pinecone base.
- Starting at the narrow end, press cereal pieces or sliced almonds into the truffle base, slightly overlapping to mimic pinecone scales.
- Continue placing cereal or almonds until the entire truffle is covered.
- Chill in the refrigerator for at least 30 minutes to set.
- Dust with cocoa powder or powdered sugar before serving if desired.
Notes
- Use chocolate almond bark for a firmer truffle base if serving at room temperature.
- If using sliced almonds, toast them lightly for extra flavor.
- Store truffles in the fridge and serve chilled.
- Great as edible holiday gifts or dessert table decor.
- Prep Time: 20 mins
- Cook Time: 0 mins
- Category: Dessert
- Method: No-Bake
- Cuisine: American
Ingredients
(Tip: You can find the complete list of ingredients and their measurements in the recipe card below.)
Chocolate Chips or Chopped Chocolate
Chocolate forms the base of the truffle mixture, giving these pinecones their rich flavor and smooth texture.
Cream or Milk
Cream creates a velvety truffle consistency, while milk lightens it slightly. Almond milk also works if warmed gently.
Butter
Butter adds silkiness and helps the truffle mixture set firmly enough to shape.
Cocoa Powder
Cocoa deepens the chocolate flavor and prevents the mixture from becoming overly sweet.
Powdered Sugar
This helps bind and sweeten the truffle base while maintaining a soft, pliable texture.
Vanilla Extract
Vanilla enhances the chocolate’s flavor and adds warmth to the overall profile.
Chocolate Cereal Ovals (like Cocoa Almond Cereals)
These cereal pieces form the pinecone “scales,” adding crunch and visual realism.
Salt (Optional)
A pinch of salt sharpens the chocolate notes and keeps the dessert from tasting flat.
Cocoa Powder for Dusting (Optional)
A light dusting gives the pinecones a rustic, woodland finish that enhances their appearance.

Directions
Begin by heating the cream or milk in a small saucepan just until warm, avoiding a rapid boil. Place the chocolate and butter in a heatproof bowl, then pour the warm liquid over them. Let the mixture sit for a minute to soften, and stir until smooth and glossy. Add the vanilla extract, cocoa powder, powdered sugar, and salt if using. Mix until a thick, cohesive truffle dough forms. Chill the mixture briefly until firm enough to shape but still pliable.
Line a baking sheet with parchment paper. Scoop portions of the chilled truffle mixture and shape them into small, tapered ovals resembling pinecones. Place each base onto the parchment. Beginning at the wider end, gently press cereal ovals into the truffle body in neat, overlapping rows, slightly angling them upward to mimic natural pinecone scales. Continue until the entire truffle is covered and resembles a pinecone.
Repeat with remaining truffle mixture. If desired, dust each pinecone lightly with cocoa powder for a more woodland-inspired look. Chill the finished pinecones until firm enough to hold their shape. Serve cold or at room temperature as part of a festive dessert display.
Equipment needed :
Must-Have Tools to Get Rolling
Here’s what you’ll want to have on hand:
Silicone Spatula – Durable, heat-resistant silicone spatula perfect for mixing, scraping, and spreading. Gentle on non-stick cookware and easy to clean.
Large pot – You’ll need this to boil the whole cabbage head and soften the leaves.
large bowl –Spacious, durable large bowl ideal for mixing, serving, or food preparation. Made from sturdy material and easy to clean.
Sharp knife – For coring the cabbage and slicing out the thick stem in each leaf. A paring knife works best.
Mixing bowl – A big bowl makes it easier to combine your meat and rice filling evenly.
Cutting board – For prepping cabbage leaves and rolling them like a pro.
9×13-inch baking dish – Ideal size to fit your rolled cabbage leaves snugly and prevent them from unraveling.
knife – A sharp, durable kitchen knife perfect for slicing, chopping, and dicing with ease
Servings and timing
Makes 8–10 pinecone truffles.
Preparation time: 20 minutes
Chilling and assembly time: 25 minutes
Total time: 45 minutes
Storage/reheating
Store pinecone truffles in an airtight container in the refrigerator for up to one week. For the best texture, allow them to rest at room temperature for 10–15 minutes before serving. These treats do not require reheating.
Variations and Customizations
Use White Chocolate
Create elegant “snowy pinecones” with a white chocolate truffle base and powdered sugar dusting.
Add Nut Butter
Stir almond, hazelnut, or peanut butter into the truffle mixture for extra richness.
Incorporate Liqueur
A splash of coffee or hazelnut liqueur adds sophistication to adult versions.
Try Graham Cereal
Graham cereal ovals produce a lighter, more rustic pinecone style.
Add Spices
Cinnamon, nutmeg, or cardamom introduce warm, seasonal notes.
Make Them Vegan
Use dairy-free chocolate, plant-based butter, and almond milk.
Add Toasted Nuts
Finely chopped toasted almonds or hazelnuts add texture to the truffle mixture.
Dip the Bases in Chocolate
For added stability, dip the shaped truffle base into melted chocolate before adding cereal.
Make Mini Pinecones
Use smaller truffle portions for bite-sized versions suitable for dessert platters.
Create Snow-Tipped Scales
Brush the cereal tips with melted white chocolate for a frosted effect.
FAQs
How firm should the truffle mixture be before shaping?
It should be chilled enough to handle but still pliable, similar to soft clay.
Can I use store-bought truffle filling?
Yes, as long as it is firm enough to mold and hold cereal pieces.
What cereal works best?
Any oval-shaped chocolate cereal closely resembling pinecone scales.
Can I make them ahead of time?
Yes, they store well for several days in the refrigerator.
Do they need to stay refrigerated?
Refrigeration keeps them firm, but they can sit at room temperature when serving.
Can I freeze pinecone truffles?
Freezing is possible, though texture may soften slightly upon thawing.
How do I keep the cereal from falling off?
Ensure the truffle base is soft but tacky; pressing gently and overlapping rows also helps.
Can I use white chocolate for the base?
Yes, simply reduce the powdered sugar slightly since white chocolate is sweeter.
Do they melt quickly?
They soften if left in warm environments, so keep them cool until serving.
Are these kid-friendly to make?
Absolutely; assembling the cereal “scales” is a fun activity for children.
Conclusion
Pinecone Truffles are a beautifully crafted dessert that blends creativity with classic chocolate indulgence. Their realistic appearance makes them an impressive highlight on any holiday table, while their simple preparation ensures they remain accessible for all skill levels. With endless opportunities for customization and a reliably rich truffle center, these pinecone-shaped treats deliver both charm and flavor in every bite. Whether you prepare them as edible décor, gifts, or part of a dessert board, they bring warmth, elegance, and festive delight to any celebration.
Hungry for more? Visit our website for full recipes and follow us on Pinterest for daily foodie inspo you’ll love to pin!