
Introduction
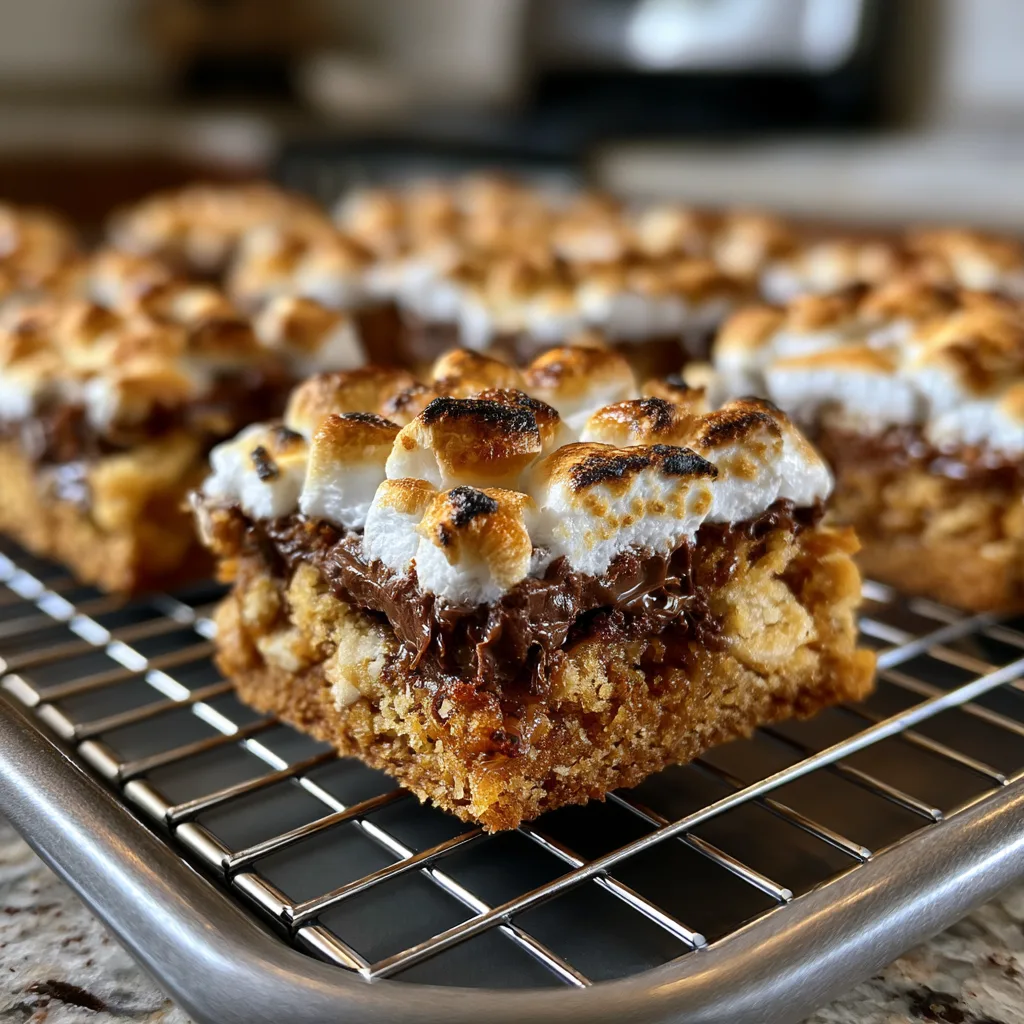
If you love the classic flavors of campfire s’mores but want an easy dessert you can enjoy any time of year, these S’mores Cookie Bars are the perfect solution. They combine a soft, buttery cookie dough with layers of melted chocolate, gooey marshmallows, and crunchy graham crackers to create a dessert that’s rich, comforting, and impossible to resist. Every bite delivers the nostalgic taste of traditional s’mores without the need for a campfire.
The first time I baked these cookie bars, they disappeared almost as soon as they cooled. The combination of chewy cookie dough, melted chocolate, and toasted marshmallows made them an instant family favorite. Since then, they’ve become my go-to dessert for parties, bake sales, and weekend treats. They’re simple enough for beginner bakers yet impressive enough to share with guests, making them a recipe you’ll want to bake again and again.
Print
S’mores Cookie Bars Recipe: Gooey, Chocolatey, and Irresistibly Easy
- Total Time: 45 minutes
- Yield: 16 bars
- Diet: Vegetarian
Description
S’mores Cookie Bars are gooey, chocolatey dessert bars featuring a buttery graham cracker cookie base layered with milk chocolate and toasted marshmallows, then baked until golden. These easy bars capture the classic campfire flavors of s’mores in a convenient handheld treat.
Ingredients
- 1 cup unsalted butter, softened
- 3/4 cup brown sugar, packed
- 1/2 cup granulated sugar
- 2 large eggs
- 2 teaspoons vanilla extract
- 2 1/2 cups all-purpose flour
- 1 1/2 cups graham cracker crumbs
- 1 teaspoon baking powder
- 1/2 teaspoon salt
- 2 cups milk chocolate chips or chopped milk chocolate bars
- 3 cups mini marshmallows
- 1/2 cup crushed graham crackers, for topping (optional)
- 1/2 cup mini chocolate chips, for topping (optional)
Instructions
- Preheat the oven to 350°F (175°C). Grease or line a 9×13-inch baking pan with parchment paper.
- In a large bowl, cream together the butter, brown sugar, and granulated sugar until light and fluffy.
- Beat in the eggs one at a time, then mix in the vanilla extract.
- In another bowl, whisk together the flour, graham cracker crumbs, baking powder, and salt.
- Gradually add the dry ingredients to the wet ingredients and mix until a soft dough forms.
- Press about two-thirds of the dough evenly into the prepared pan.
- Sprinkle the chocolate chips evenly over the dough.
- Top with the mini marshmallows.
- Crumble the remaining dough over the marshmallows, leaving some areas exposed.
- Sprinkle with crushed graham crackers and additional mini chocolate chips if desired.
- Bake for 28-32 minutes, or until the top is lightly golden and the center is set.
- Cool completely before slicing into bars.
Notes
- Allow the bars to cool fully for clean, even slices.
- Use chopped milk chocolate bars for gooey melted chocolate pockets.
- For extra toasted marshmallow flavor, broil for 1-2 minutes at the end of baking while watching carefully.
- Store in an airtight container at room temperature for up to 4 days.
- These bars also freeze well for up to 2 months.
- Prep Time: 15 minutes
- Cook Time: 30 minutes
- Category: Dessert
- Method: Baking
- Cuisine: American
Why You’ll Love This Recipe
- Easy to make with simple pantry ingredients.
- Soft, chewy cookie bars with crispy edges.
- Loaded with gooey marshmallows and melted chocolate.
- Perfect for parties, holidays, and bake sales.
- No campfire required.
- Family-friendly and kid-approved.
- Great for making ahead.
- Easy to slice and serve.
- Rich, buttery flavor in every bite.
- Perfect for satisfying chocolate cravings.
Ingredients
Tip: You can find the complete list of ingredients and their measurements in the recipe card below.
All-Purpose Flour provides the structure for the cookie bars while keeping the texture soft and chewy. Measuring the flour accurately helps prevent dense bars.
Baking Powder gives the cookie dough a gentle lift, creating a tender texture without making the bars cakey.
Salt balances the sweetness while enhancing the flavors of the butter, chocolate, and marshmallows.
Unsalted Butter creates a rich, buttery base and contributes to the soft texture. Using softened butter allows it to cream smoothly with the sugars.
Brown Sugar adds moisture and a subtle caramel flavor that complements the graham crackers and chocolate beautifully.
Granulated Sugar provides sweetness while helping the edges become lightly crisp during baking.
Eggs bind the ingredients together and help create a soft, chewy crumb.
Vanilla Extract enhances the overall flavor and adds warmth that pairs perfectly with the chocolate.
Graham Crackers provide the signature crunch and classic s’mores flavor. Broken pieces throughout the bars create wonderful texture.
Milk Chocolate Bars deliver the traditional s’mores experience with smooth, creamy chocolate that melts beautifully during baking.
Semi-Sweet Chocolate Chips add extra chocolate flavor while balancing the sweetness of the marshmallows.
Mini Marshmallows become perfectly gooey and lightly toasted in the oven, creating the classic s’mores texture everyone loves.
How to Make
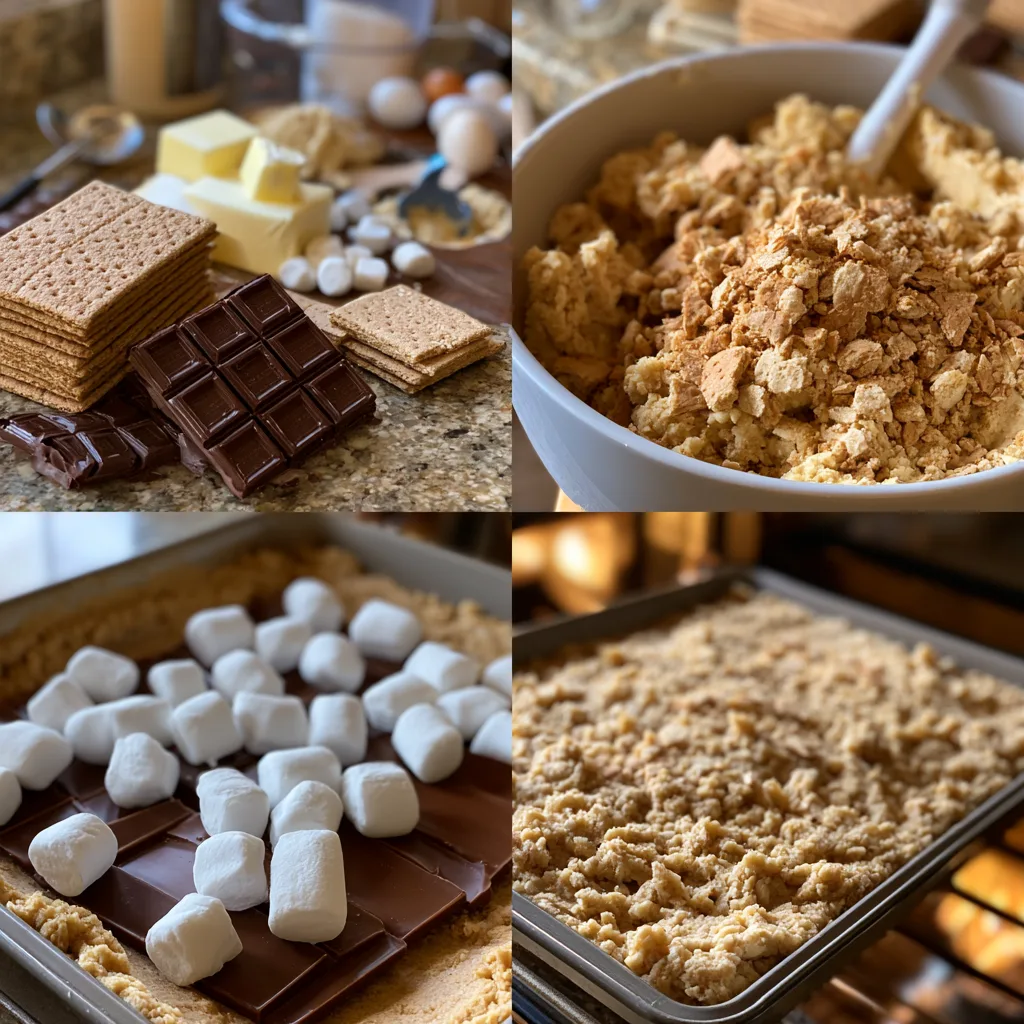
Preheat your oven to 350°F (175°C) and lightly grease or line a 9×13-inch baking pan with parchment paper for easy removal.
In a medium bowl, whisk together the flour, baking powder, and salt until evenly combined.
In a separate large mixing bowl, beat the softened butter, brown sugar, and granulated sugar until the mixture becomes light and fluffy. Add the eggs one at a time, mixing well after each addition, then stir in the vanilla extract.
Gradually add the dry ingredients to the wet ingredients, mixing just until a soft cookie dough forms. Avoid overmixing to keep the bars tender.
Spread about two-thirds of the cookie dough evenly into the prepared baking pan. Arrange the graham cracker pieces over the dough, followed by the milk chocolate bars and semi-sweet chocolate chips. Sprinkle the mini marshmallows evenly across the top.
Drop spoonfuls of the remaining cookie dough over the filling. It doesn’t need to completely cover the marshmallows, as leaving small gaps allows the gooey filling to peek through after baking.
Bake for 28 to 35 minutes, or until the edges are golden brown and the center is just set. If the marshmallows begin browning too quickly, loosely cover the pan with foil during the final few minutes of baking.
Allow the bars to cool completely before slicing into squares. This helps the chocolate set slightly while keeping the center deliciously soft and gooey.
Common Mistakes to Avoid
- Overbaking the cookie bars.
- Overmixing the dough.
- Using cold butter instead of softened butter.
- Cutting the bars before they cool.
- Packing the flour too tightly.
- Using stale graham crackers.
- Overfilling with marshmallows.
- Skipping parchment paper for easy removal.
Equipment Needed
Here’s what you’ll want to have on hand:
Silicone Spatula – Durable, heat-resistant silicone spatula perfect for mixing, scraping, and spreading. Gentle on non-stick cookware and easy to clean.
Large pot – You’ll need this to boil the whole cabbage head and soften the leaves.
large bowl –Spacious, durable large bowl ideal for mixing, serving, or food preparation. Made from sturdy material and easy to clean.
Sharp knife – For coring the cabbage and slicing out the thick stem in each leaf. A paring knife works best.
Mixing bowl – A big bowl makes it easier to combine your meat and rice filling evenly.
Cutting board – For prepping cabbage leaves and rolling them like a pro.
Full-Size Blender – is a powerful kitchen appliance for making smoothies, soups, and sauces in large batches.
3-in-1 Air Fryer – This versatile 3-in-1 air fryer offers Air Fry for healthier meals with less oil, Bake for bakery-quality desserts and treats, and Reheat to bring leftovers back to life with crispy, flavorful results
Servings and Timing
- Servings: 16 bars
- Prep Time: 20 minutes
- Cook Time: 30 minutes
- Total Time: 50 minutes
Storage/Reheating
Store the cookie bars in an airtight container at room temperature for up to 4 days or in the refrigerator for up to one week. For a freshly baked texture, warm individual bars in the microwave for 10 to 15 seconds before serving. You can also freeze the bars for up to 3 months by wrapping them individually and storing them in a freezer-safe container.
Variations and Customizations
One of the best things about S’mores Cookie Bars is how easy they are to customize. Whether you’re baking for a special occasion or simply experimenting with new flavors, there are plenty of creative ways to make this recipe your own.
Try using dark chocolate, white chocolate, caramel-filled chocolate bars, or peanut butter cups in place of traditional milk chocolate. Each option creates a unique twist while maintaining the classic s’mores experience.
Mix additional ingredients into the cookie dough such as chopped pecans, walnuts, toffee bits, mini chocolate chips, or crushed pretzels for extra texture and flavor.
If you enjoy a richer dessert, drizzle melted chocolate or caramel sauce over the cooled bars before serving. A light sprinkle of flaky sea salt also enhances the sweetness while creating a gourmet finish.
For a festive version, decorate the bars with colorful sprinkles or seasonal candies for holidays and celebrations.
Swap the vanilla extract for almond extract or add a teaspoon of cinnamon for a subtle flavor variation that pairs wonderfully with the graham crackers.
Mini marshmallows work best, but regular marshmallows cut into smaller pieces can also be used if needed.
Serve these cookie bars slightly warm with a scoop of vanilla ice cream or a dollop of whipped cream for an indulgent dessert. They also pair perfectly with coffee, hot chocolate, or a cold glass of milk.
Because they travel well and stay soft for several days, these cookie bars are an excellent choice for potlucks, lunchboxes, bake sales, and family gatherings.
Nutrition and Dietary Info
| Nutrient | Per Serving |
|---|---|
| Calories | 340 |
| Protein | 4 g |
| Carbohydrates | 47 g |
| Fat | 16 g |
| Saturated Fat | 9 g |
| Fiber | 2 g |
| Sugar | 30 g |
| Sodium | 180 mg |
Nutrition values are approximate and may vary depending on the ingredients used.
Expert Tips & Customizations
Use Room Temperature Ingredients: They combine more evenly and create a smoother cookie dough.
Don’t Overbake: The bars continue to set as they cool, keeping the centers soft and chewy.
Line the Pan: Parchment paper makes lifting and slicing the bars much easier.
Layer Evenly: Distribute the chocolate and marshmallows evenly for consistent flavor in every bite.
Cool Before Cutting: Allowing the bars to cool prevents the filling from becoming too messy.
Add a Pinch of Sea Salt: A light sprinkle enhances the chocolate and balances the sweetness.
Serve Warm: Slightly warming the bars before serving creates an extra gooey, freshly baked texture.
FAQs
Can I use chocolate chips instead of chocolate bars?
Yes. While chocolate bars provide the classic s’mores texture, chocolate chips work just as well.
Can I make these cookie bars ahead of time?
Absolutely. They stay fresh for several days and are perfect for preparing in advance.
Can I freeze S’mores Cookie Bars?
Yes. Wrap each bar individually and freeze for up to 3 months.
Why are my cookie bars dry?
Overbaking or adding too much flour can result in dry bars. Measure carefully and remove them from the oven once the center is set.
Can I use large marshmallows?
Yes. Simply cut them into smaller pieces so they distribute evenly throughout the bars.
What should I serve with S’mores Cookie Bars?
They’re delicious on their own or served with vanilla ice cream, whipped cream, hot chocolate, coffee, or a cold glass of milk.
Conclusion
These S’mores Cookie Bars bring together everything you love about classic campfire s’mores in one easy-to-make dessert. With buttery cookie dough, melted chocolate, crunchy graham crackers, and gooey toasted marshmallows, every bite is rich, chewy, and full of nostalgic flavor. Perfect for parties, holidays, or simply treating yourself, this recipe is sure to become a favorite that friends and family will request time and time again.
Hungry for more? Visit our website for full recipes and follow us on Pinterest for daily foodie inspo you’ll love to pin!